Showing posts with label decorating. Show all posts

March 25, 2014

light and bright (and very white)

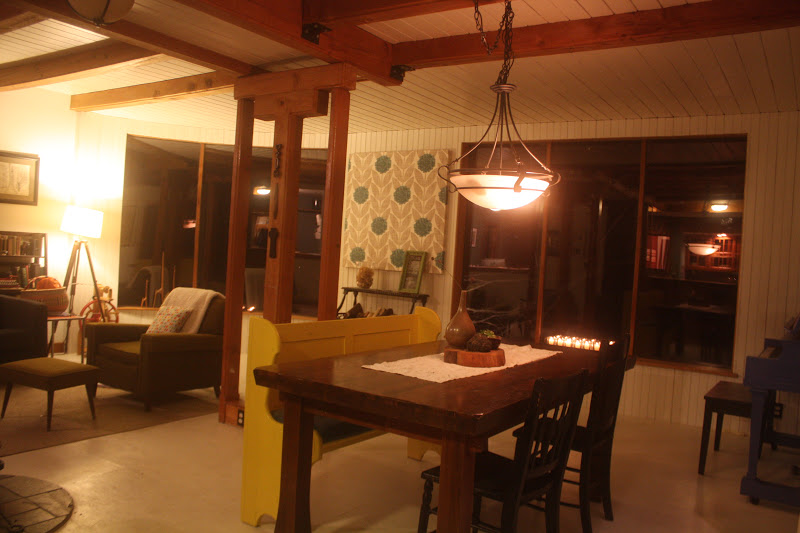
We're not quite settled enough for a full on tour of our new digs, but I though I'd share a few photos of the main living spaces with you. They are my favorite rooms in the house and the only ones that are looking semi-close to "done". Not that they, or any room that we inhabit, ever, will be done, we're strange like that. But these are at least getting there.

The house was built in the early 1920's and thankfully, mercifully, people have left it pretty well alone in the almost 100 years since. Other than new windows, which aren't as pretty as the original ones but have the benefit of opening rather than being painted shut (which is inevitable on old houses with original windows), slightly boring but not out of place kitchen cabinets and a truly ugly yellow 1970's bathroom vanity, most of the details and fixtures are there.

Ironically, Will and I have spent the past two years shifting our furniture away from "it looks good in a bungalow" and toward "Mid Century/Scandinavian/Vermont Farmhouse". I keep wishing we hadn't gotten rid of our little leather love seat or the comfy, ratty armchair that I recovered in orange. They both would have looked good in this house. And we could have used them to pad out the (HUGE!) living room, which clearly needs more...something. Another couch? Two more chairs? We're not sure. But something. Actually we need chairs all over the house. I'm not sure how we ended up short of seating in just about every room, but we did. I have a list in my bag just in case I come across something at a vintage store or garage sale. Tall stool, dining room chairs, armchair for the bedroom, desk chair for the hall, couch for the living room, chair for Evie's desk, bench for the bathroom....See what I mean? Chairs, we need chairs!

And color. The house is white. Oh so white. White EVERYWHERE. Every single surface except the wood floors...white. Even the outside. I think they bough paint in bulk and went to town. I actually like white and thankfully I like this white, but it might be a little too much white. We're debating between just adding colorful things to the house and painting, just a few rooms, just so the white isn't so...everywhere. On the upside the house is bright and light and even on cloudy days (of which there are and will be many, this is Portland after all) it doesn't feel dark, which is a big plus.

But all that aside, we're enjoying the new house. It's silly and ridiculous but I get a little buzz of happiness just looking at bungalow rooms that I don't get with anything else. I'm a sucker for a good built in glass fronted bookshelf and picture rails, what can I say?

November 9, 2012

yellow

The pew I bought a few months ago has been sitting up to our dining room table in it's half spray painted brown state ever since I brought I home. Much as I disliked the brown splattered white look, I couldn't decide what color to paint it. So it sat while we stacked wood and painted the book nook and did plenty of other little jobs around the house.
But this weekend, with nothing particular to do on our list and dropping temps outside, I decided to try yellow.
I'm not totally sold. I like it, a lot actually, but I'm not sure I like it with the black chairs. Or maybe it's the table. Hummm.
Right about the time that I was twiddling my thumbs waiting for the umpteenth coat to dry (cause it took a lot of them) on the pew, a package landed on our porch with some funky fabric I ordered for pillows. (Modeled here by the lovely Pebble) So by the end of the weekend, we were pillowed and yellow pewed and a little bit brighter and yellower.

August 14, 2012

blue and roses

Well, in the end, we did not rip up carpet. Will (rightly) pointed out that if you are going to paint the walls and the ceiling of a room (and we are) and are also going to rip up the carpet (most definitely to that as well), you might as well use the carpet for a drop cloth. So instead of ripping up our drop cloth, we started painting. I'd love to show you pictures but as it is beadboard we are painting, we didn't get very far. I'm going to take a leaf out of Lola's books (still favorites around here) and say that painting beadboard is NOT my favorite or my best. Instead, we'll take a little tour of the only room in the house that looks remotely done-ish. Evie's room.
Because we have lived most of our adult lives together in what New Yorkers would call "Pre-war" dwellings, plus a few immediately post war houses, our furniture is proportioned for bungalow-esque rooms. Small, square, symmetrical. Add to the mix that large chunks of our furniture did not make it during this last move - the chairs simply died, as did the small buffet table. The loveseat, well I can't actually remember where the loveseat went but it's not here - and we are a bit sparse around here. Hence the anniversary armchair. Briton is getting a new bed, when we get around to building it and we are on the hunt for one for ourselves. There are no chairs in the dining room or the sun room (so two tables to eat at but no chairs to sit in, it's a problem) and one of the seats in the den is a camping chair. But Evelyn, lucky girl that she is, had all the furniture she needed sitting in storage just waiting for her to have a room of her own again.


I won't call it done, because it's not, not by any means. But it's inching it's way there. There is a quilt still to be made. Blue and roses, at her request. The carpet needs to be gone, as it does all over the house and she needs a nice fluffy rug. And a bed skirt. And probably less things in her room, although I doubt that will happen because she loves it the way it is.
 There is much primping of the room. When we first put her vanity together she asked me for some "pretty things" to go on top. So as I've unpacked I've found various pretty little things. An old silver brush. A tray, a purse, some little houses. She tells me all about it as she tidies up in the morning.

"This is my art drawer. And this is for my jewelry."
 "The brush goes here mom, on the tray!"

"Eliza goes on the bed, and the puppies go in the cradle and the other dolls go in the big cradle."
 There are cats, cut out of fabric and ironed on using Stiffin Stuff, on her windows and old embroidered pillowcases pinned up for curtains. The bed and the vanity that we bought for her when she was two, knowing she would love it and the dresser, once her brother's, that I painted to match. There are words from a favorite song on her wall.

"Witches can be right. 
Giants can be good. 
You decide what's Right. 
You decide what's Good."

A good lesson for a fairytale loving girl, I think.

She loves it. And I love that she loves it. And that one room is, at least partially, done.

Now, back to the beadboard I go.

March 7, 2012

flower mugs:a tutorial

Round about Christmas a tutorial for personalized initial mugs went flying around the crafty blogs. I remember reading it and liking the idea, especially as a teacher gift, but at the time I didn't have time to hunt down the special pens and try it out. And then when I finally stopped long enough to search them out, they were sold out just about everywhere. Oh well, mugs with letters on them weren't really my style anyway, I figured. But just for kicks, I put in a order for one pen to come whenever they did get them back in stock. And then I sort of forgot all about it.
Imagine my surprise when a package arrive a week or so ago with one box of porcelain pens in it. Six pens, not one. I'm still not sure who made the mistake, the quantity was a little ambiguous so one could very well have meant one box. But I'm getting off topic here.

If you've been reading this here little ol' blog for a while, you may remember my Keep Calm and Carry On Mugs that Will made for me a few winters ago, before Keep Calm was everywhere. (You can see them here, hanging in my pretty kitchen, sob, sob) I have loved those mug, the sentiment on them is perfect for my life, but I don't love that it's so common now and I really don't love that the paint is chipping away from them in droves every time I wash them. They are starting to have a bit of a battle distressed look. I'd like to replace my mugs with a collection of handmade ones but that's going to take time, and in the meantime I picked up a set of plain white mugs at Homegoods last time we had visitors. Can't have people fighting over their coffee cups now, could I. So when the pens came, it seemed like a good opportunity to try them out.
Before I start, however, I should tell you that I can not draw. I'm terrible at it. But I can, if pressed, sort of look at a drawing and copy it in a very very basic way. I probably should have had Will do the drawings but as he is mired down in mid-term projects at the moment, it didn't seem quite the time for it. The dandelions are both inspired by some clip art I used in my planner last year and the other flowers (mums maybe? dahlias?) I saw somewhere and saved on my desktop.

It's a little hard to call this a tutorial, since mostly what you are doing is drawing on a mug, but here are a few things I figured out in the process that I didn't really get from the original tutorials.

1. Clean your mug really, really well. Because you are going to bake these things, and you don't want to end up baking on a coffee stain.

2. If you make a mistake wipe it off pronto. The ink dried quickly and is hard to get off once it does so wipe away right away and if you need to scrap any residue with your fingernail.
3. The pens goop up. I stopped in the middle of my first mug to attend to some kind of kid crisis and when I came back to it the pen wouldn't work. At first I thought it was out and spent some time grumbling about crappy pens and also thanking the gods of misordering for sending me some back ups, but then when the second pen stopped working when I paused to decide how many dandelions I wanted on the second mug, I realized that it was just clogged. So have a piece of paper handy that you can use to wipe the tips. Just drag the nib sideways along the paper, twirling a little as you go, to pull off the dried up ink and you are good to go.

4. The directions say to bake at 150 once you are done to set the ink. I don't know about your stove, but my crappy apartment, ten degrees hotter in the back than the front oven does not go down to 150. 200 is the lowest temperature, but that worked fine too. And don't forget that you have to wait 24 hours after drawing before you bake to let the ink dry. I'm not actually sure why on that one, but that's what the directions say, so best to do it.
And that's really it. I like these pens, the end result looks pretty darn good and it's really a fun little project. I'm on the hunt for some plain egg cups right now to decorate for the kids, or maybe with the kids and I have some ideas about a cake stand with a doily drawn right on the top, but that one will probably have to wait till I have, you know, room for a cake stand. And an oven that doesn't hate me so I can start baking cakes again.

December 6, 2011

painted lady: a tutorial

So I painted a chair.
Which, on the surface, doesn't sound all that exciting. I mean, chairs get painted all the time. I seem to paint chairs all the time.
Except this time, I painted the fabric of a chair.
A while ago I pinned a how-to on Pinterest on painting upholstery, just because I thought the idea was interesting. And when the slipcover on my beloved rocker ripped at the corners (living in the kitchen means the white fabric needs a lot of washing) I decided to give it a go and see what happens. I could always fix the slipcover if it turned out awful.
Because our kitchen is sort of cave-like and white, which brightened it up but always looked dirty, wasn't working, I went bright and bold. And I gotta say, I'm loving it. This chair has been hanging around since Evelyn was born. A craigslist find, it has, possibly, the ugliest fabric ever and has been draped with blankets and sheets, faux slipcovered (as in, fabric and strategically placed pins) and finally slipcovered last year. It's my favorite chair ever, and it always makes me a little sad that underneath it's so freaking ugly and dingy, so now chair and I are both happy.
The process took several coats. In fact, I think I may do one more on the seat and see if I can get the texture of the fabric to disappear completely, you can only see it now when the light is right, so maybe one more coat will take care of it. For the first few coats I used Delta Fabric Medium, mostly because I couldn't find fabric medium anywhere and ended up ordering it from Amazon, and that's what was available. Right about the time I was going to order a new bottle, our behind-the-times Michael's set up a new display of Martha Stewart crafts paints, which included fabric medium. I'm not sure if it was because I was on a later coat or because it was actually better stuff, but the paint seemed to adhere better with the MS medium. If I were dong this again, I'd start with hers.

Some of the tutorials I found used craft paint as a base and then latex paint, some used all craft paint, some used all latex paint. I went with the all latex route so that I wouldn't have to try to match paint at either end. In my experience, it never really matches anyway, so I saved myself that headache.

And one last note, the sanding step is important. I know, it seems weird to sand it. But it turns a plasticy surface back into a fabricy surface. Not soft soft fabric, but this chair was never soft soft, but comfortable to sit in at least.

Supplies:
Interior Latex Paint
two bottles (at least) fabric medium
Foam paint brushes
Disposable paint containers
Newspaper
Spray bottle full of water

Oh, and a chair, obviously

First, vacuum the chair well, get way down in the crevices. Once it's nice and clean, mix up the first Batch of paint. You'll want to set aside one full bottle of fabric medium for the later coats, so don't use it all here. Combine the paint and medium at a ratio of 3 to 1 and mix well.
Spray the entire chair with water, get it really nice and wet. You can spray a section at a time as you work, but in my experience, one area leads to another and it's easy to forget to stop and spray. Check the fabric as you work and respray as needed. The water lets the paint absorb into the fabric, so make sure the area you are working on is pretty damp as you paint.

If, like me, you want any piping on your chair to be a different color, it's probably easier to start with that. I painted three coats of white (same ratio of paint to medium) on all the piping, spilling over a bit onto the main fabric to make sure I got the white into the cracks. If I had been patient enough, I would have done several more coats and then taped if off after it dried, but I wanted to get going on the rest of the chair, so I free-handed the edges. It's not perfect, but it works.

Paint the entire surface of the chair with the main paint color, allowing the coats to set up a little before adding the next and spraying water before every coat. First it looks like this.
Then this
At this point I ran out of medium and let the paint dry overnight. Once I was sure it was really dry, I sanded the whole chair with a very fine grit sandpaper.

And then I got busy and forgot about the project for a few weeks. But you don't have to wait that long.

Once I had more medium and had a free(ish) evening, I repeated the process, including repainting the white piping again, although this time I just painted the piping. This time around, however, I used a 1 to 1 ratio paint and medium. But the process remained the same. Spray and paint, spray and paint.
I did two final coats with this round and have paint left over in case I decide to do one more on the seat. It needs a final sanding so I'm waiting to see how I like it after that before I decide. But overall I'm really happy with it at this point. I sit in the chair a lot, it's really my spot in the house, and I find the painted fabric plenty comfortable. More so than the original which was itchy, and at least as comfortable as the twill of the slipcover. Someday, when I have time and money and a house that I'm not planning to move from EVER, I'll reupholster the old girl, because I really do love her, but for now, I like the bright spot of color in my kitchen.

*PS. Forgive the poor quality of the photos, I did most of this project late at night and it's pretty dark in here even on bright days right now due to the winter sun being somewhere not near our windows, so everything is a little dark and dim. But you get the idea.

June 21, 2011

the map wall

Before I get started whinging (and I'm going to whinge, but only for a bit) I should begin by saying that I know I'm lucky to live in New York and at the same time, have three bedrooms at my disposal. I really do. I had expected to have one really, and Will and I were fully prepared to sleep in the living room for the year. So truly, I know I'm a lucky girl.
But since we do have them...our dining room/office/school room has been driving me a little nuts. We bought a table before coming, having measured the room on our little floor plan and deciding that this one would fit and still give us plenty of room to work. But at the time we had hoped to somehow squeeze a little table for eating into the kitchen. Alas the kitchen has some space at one end but not enough to eat in, so the office/school space had to serve for dining as well. I know that we could just eat in the living room but I really, really like to have a sit down dinner every night. Even if it's a disastrous, chaotic three minutes of eating, at least we're all sitting down together, know what I mean? And while the table was a good size for a pushed-against-the-wall desk, it's a bit big as a pulled-out-from-the-wall table. But we can squeeze.

The thing that really bothered me was that it didn't feel like a dining room, or an office or a school room. It just felt blah. The shelves, which we got free off of someone moving out the week we moved in, are jam packed and too shallow to hold our things and the yellowy walls look more yellowy with the random world map and periodic table on the wall. Not pretty. And, ridiculous as it is. I like pretty. We spend a lot of time in this room, we're going to spend a lot of time in this room. So I really needed to like it, at least a little bit more.
So I did some thinking. As in, I sat in the room a lot staring at the walls. It's a good thing my kids are currently in a "don't bother us we're playing Lego's phase" because otherwise my staring at the wall would have been a bit, um, neglectful.

I liked the idea of maps, but the too colorful ones I'd bought weren't really doing it for me.
What I really wanted, I decided, was one of those cool pull down sets of maps that used to be in every high school history classroom. Funky enough to look good in a dining room, but useful too. Other than the whole, inaccuracy of old maps thing. Except wowza, those things are expensive. And heavy to ship. And totally not doable.
Happily, while I was scrolling through maps on ebay I found many, many offerings of piles of old National Geographic maps. Cheap. So I picked one and figured,what the heck, if they didn't work, I could always use them as wrapping paper. The set I bought came, coincidentally, from New Jersey, so they showed up the day after I paid for them. And after a morning of shifting chairs that had been nightstands and closet storage and some more neglectful-but-for-Lego-mania map hanging time, we had a more dining friendly space and a map wall.
And as ridiculous as it sounds, I'm so much happier now. We eat there, we play there, we study (a very little bit so far, but it's summer still) there, Evie spends hours gluing, cutting and coloring there. We like it in there. And I guess that means it was worth the stupid deco-worrying.
There are still things to do. I'm on the lookout for an armoire to replace the shelves before they fall completely apart. Something that can hold all our papers and glues and computer books and teaching materials more efficiently and maybe even have room for some more things to come. I'd like to get a few more plants for the table and a less yellow light cover would be lovely, but that will come. For now, I'm just happy not to want to cringe every night at dinner.
What do ya think? Better? Any thoughts on making it better still? What else could I use as storage? Ideas?

March 10, 2011

springify

The other day I was puttering around on one of my new favorite blogs Tinajo At Home and I came across this image. As intended, it perked up my morning but it also gave me a little inspiration. I've been kind of bored by our living room lately.
In the winter I love that it's darker and cozier than the rest of the house, lots of browns and oranges and mustards, perfect for cold weather. But I'm in a spring kind of mood so it was just feeling heavy and blah to me. Earlier this year I swapped out our old brown slipcover for a white one and that does help, especially now that I've put the arm slipcovers back on. Will took them off around Christmas to reveal the brown underneath for a funkier look, which, again was fine for winter but is too dark these days. But it wasn't enough. Part of me would like to take out all the orange elements for the spring and replace them with lighter ones but 1) I can't really spend the money to on a new set slip cover for the chair and a more neutral set of nesting tables (which we use all the time and can't live without) and 2) I actually love the orange, it just needed a little spring zing. So finding that robin's egg blue mixed with our deep 1970's orange looking so fun and bright made me smile. And go hunting around the house for some blue to add to the room.

It's amazing what you can find if you look. A pashmina, a little statue I brought home from Italy as the summer after high school,the dried hydrangeas from our weeding (yes, 10 year old hydrangeas!) some jars that I painted last year for our outside table. I wrapped a pillow in some blue knit fabric I had (you might recognize it from this skirt) to see the effect. I like it, although I think I might look for some nice, crisp orange fabric as well. I love the pillows in the image and would love to find something similar, maybe big dots.
It's not a huge change, the rug is looking way heavy to me now, I wish we had something without a pattern so that color changes were easier, maybe in time. For now it will have to do. But the overall effect, though subtle, made me smile.

Do you change things out with the weather or just keep things all year? How do you springify?

In other news, the police showed up at our house this morning to tell us that someone had been calling 911 from our land line. Except we haven't had a phone plugged in since the Obama election. Living in a swing state was just too much for me, I couldn't take the robo calls, and then when we didn't miss it, we never plugged it back in. (and to answer your question, we can't get rid of it because insanely it would cost us MORE to have just internet than it does to have the disconnected phone and our connected internet. Don't get me started about the stupidity of that!) I called the phone company and they have no idea. Hummm....it's a mystery.

And also, Evie drew this picture and it keeps cracking me up. That's me saying "Oh no!" and Briton after a fall from the tree, or so she says.

February 22, 2011

the blank space on the wall

Will and I have moved so much in our life together, so, so much. And over the years we've developed a sort of unspoken policy about art on our walls. It goes up within the first three days of moving in or bust. It doesn't matter if walls will need to be painted or we're not sure that the funiture will stay where it is, the art (and I'm using "art" loosley, we have no "art" but lots of photos and pictures and posters that we have collected over the years) goes up as soon as possible, because if it doesn't it might never go up. Case in point, the blank spot on the dining room wall.When we moved into this house we had most of our stuff up on the walls even as the kitchen sat half finished, the coutertops dried on the deck and piles of unsorted belongings everywhere. But there was one spot that we missed. Or maybe missed isn't the word. Nothing we had seemed right so we decided to get something new for the spot. And then, well, we finished the kitchen and moved on to the long list of other projects, and we never got around to that wall.
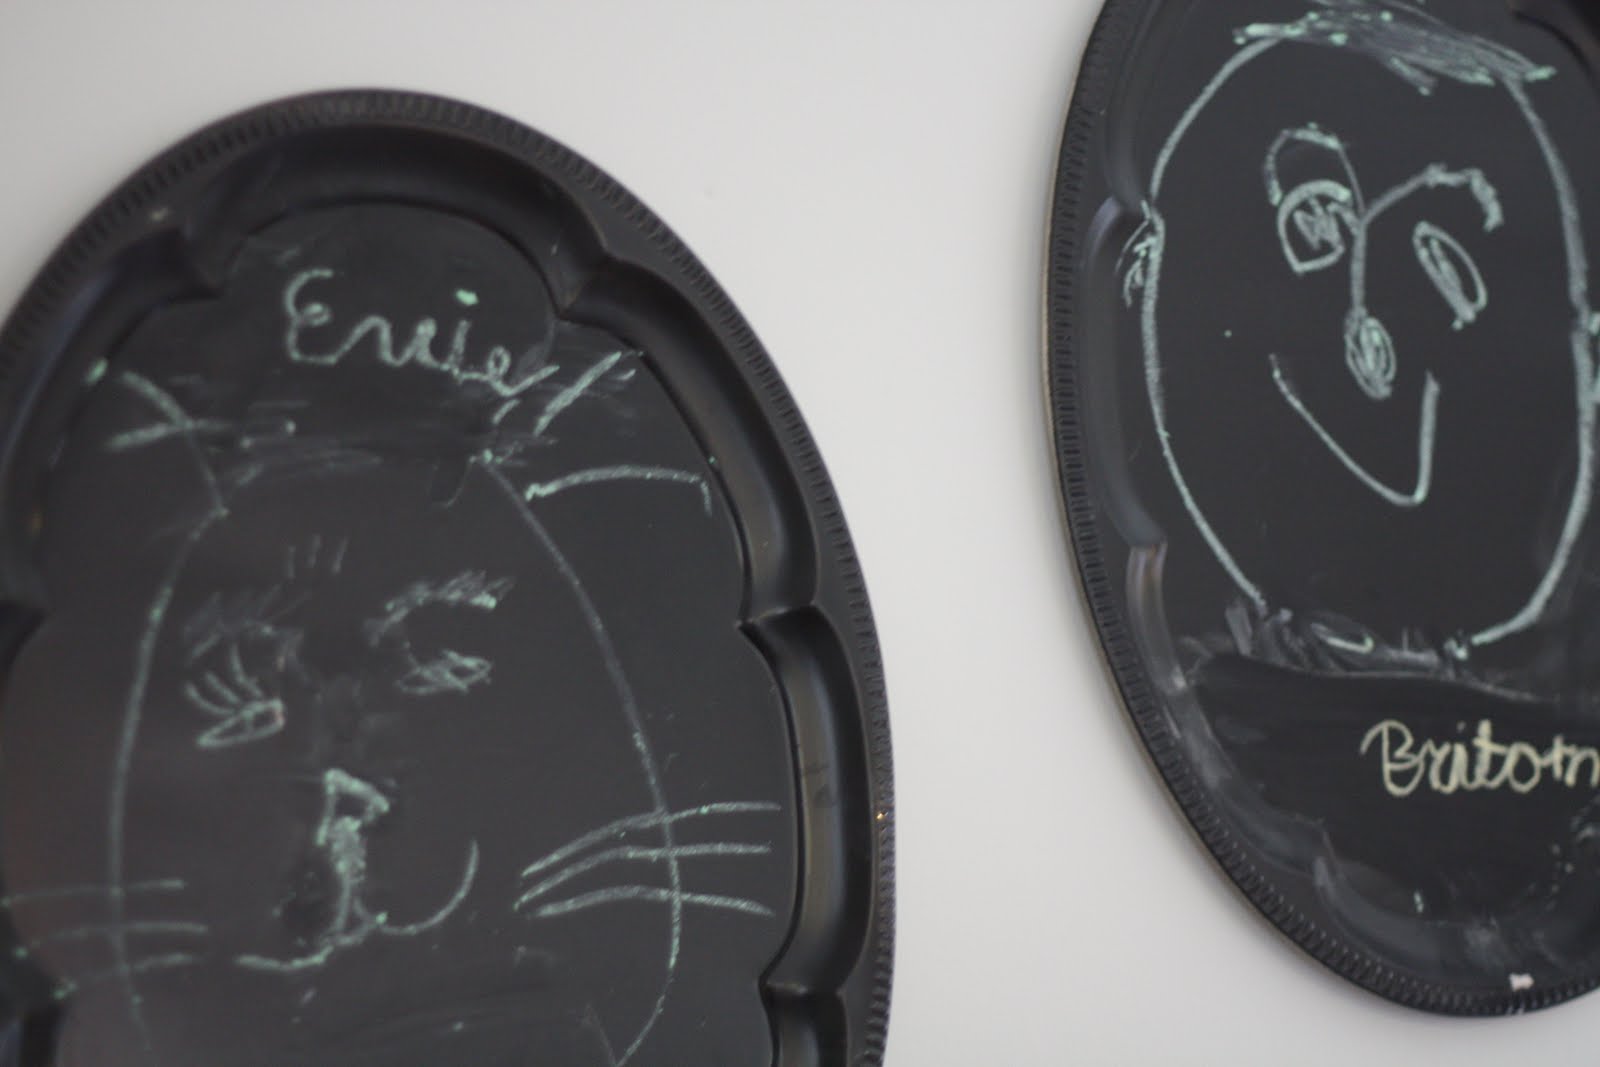
A few weeks ago I picked up some metal serving trays at a local charity shop and painted one of them with chalkboard paint to hang on our air duct as a message board. I attached magnetic strips to the back to hang it but once it was up I decided I didn't like it there and started looking around the room for a better spot. Like the blank spot. It was too small on it's own so I painted the other tray to match and hung them on the wall by screwing magnetic sheeting right onto the wall.
I had the kids do portraits of each other for the time being. Eventually, when Will isn't so swamped with work I want him to draw the kids silhouettes onto them. I think I could actually add something else up there as well, but at least now there isn't just nothing there. Much better. And fun as well :)

January 11, 2011

Bathroom Progress (Hint, There Hasn't Been Any!)

No, really, not anything. Will and I went and stood in the bathroom for about ten minutes on Saturday and then, after watching the dog walk in circles a few times trying to figure out how to get out, we shut the door and went on to other things. Some time I'll tell you how many times I said "oh shit!" when I was putting in the tile floor. It was a lot. A LOT. And probably part of the reason it's been left undone for all these weeks. But now I'm past that and ready to get going again. Except we can't.
Here's the problem. And I'll admit straight away that it's all me. I want this sink. It's not even a specific sink, it's a specific kind of sink. I want an old fashioned, cast iron, slightly school bathroom looking hang-on-the-wall sink. Why? I don't know, I just do! I want something that I can paint the underside the same color as the wall so that the white of the beadboard and the sink and toilet and mirror frame and the tile are a little broken up. And now that the idea is in my head, well, I can't seem to let it go.

It's not that we can't find the sink either. We did find one. For $20 at the Habitat Store, which is a total deal considering the alternative is a pedestal which will run us closer to $100. The problem is that the sink is so freaking heavy. And Will is freaked out a little about trying to hang it up. Well, he's more freaked out about it falling down if we don't do it right. And I get that. But they wouldn't make wall mounted sinks if it weren't possible to install them, right?

So I've been doing a little research and it seems that we can put bracing between the studs where the sink will hang and then attach a bracket onto the bracing and all will be good. Yes? No. Because we have already hung the beadboard over the place where the bracing will need to be. So in order to have my sink we have to pull off that piece of beadboard, which Will is convinced will break necessitating a replacement sheet of beadboard. Now to my mind, this isn't so bad. For one thing, we can re-drill the holes for the pipes and do it a little neater this time since we were a tad off before. Plus it will give Will the chance to use both his NEW air compressor stapler thing AND his favorite tool, the Sawzall (did I ever tell you that I went for years thinking it was called a Za-Za? That Texas accent man, it's not there often but when it pops up I can hardly understand the guy! It wasn't until I saw the actual tool that I got it) So this should be a good thing. But anything that requires a return trip to Lowes bums us both out. And so we do nothing.

Our choices are to
a) suck it up and do what we really want to do (ok, what I really want to do) or
b) go with a pedestal sink which can be found down the road at the Habitat Store. Easy Peasy. Normally I like pedestal sinks the best, but for some reason I just don't want one in this case. Sigh.

In the meantime we can't caulk the seams or paint the beadboard or put the toilet back in because the piece of beadboard in question is kind of central to the bathroom. It's a stalemate folks. I'm on the verge of just going with the pedestal, which I'm sure will look nice and which we won't have to worry about when the kids are in there messing around in the water and hanging on the sink like monkeys. The only thing that keeps me convinced that we should go for the wall sink is that, during the kitchen renovation we waited for what we wanted (except for the faucet which we just bought and which I hate. SEE!) and we ended up with a kitchen we love. Now, I wont go so far to say that we will love a bathroom. I mean, it's a bathroom. Not even a bathroom, it's a powder room. It's so small the dog gets stuck in there. But I would like to have a bathroom that I don't walk into and think "humm, when we renovate this again...." because that would suck.

So, what do you think? Hold out or give in?

December 9, 2010

It's That Time of Year Again (Demo Time)

I knew we couldn't stay away for long. We always say, "this is enough! Time to stop!" and then, well, something starts bugging us and before long, out comes the sledge hammer again.
This time it's the downstairs bathroom. We have said all along that it should be the last thing to be renovated because we use it to wash out paint brushes and scrub off the debris of construction so it is totally trashed. But Will has decided that it can't wait. And honestly, I don't think we will ever call this house "done" so we might as well.

But why, you ask, in the middle of the holidays? Oh, well, you know. We're nuts. I did, shortly after moving in here, paint the walls and trim and cabinet so that it was at least a little nicer than it had been, but the tile is old, the sink is old (not in a good, cute retro way either, in a badly made in the 1980's way) and the floor is in bad shape. But if those things were the only problem, we'd probably just keep what's there for at least another year before tackling it. But that's not the real problem. Or the real reason that it's now go time.

For as long as we have lived here and no matter how hard/often we clean, that bathroom smells like a train station public toilet. Yeah, ick, right? I can go in there and disinfect every surface in the room and it still smells wonky. We tried replacing the toilet but that hasn't helped. The only thing that seems to alleviate the problem a little is to keep the window open, and right now it's 17 degrees outside. So, no.

Now, part of this is that the bathroom has no exhaust and so no real air flow, but we suspect that there is something going on with the plumbing under the tile, which means that the tile needs to go. And if the tile on the floor needs to be replaced, well, then the cabinet has to come out. And if the cabinet comes out then the wall tile comes down and you see where I'm going with this. TBO. Total Bathroom Overhaul.

The good news is that it's a very, very small room. Smaller now than when we moved in due to the locker insertion/wall move. And as it's only a powder room we don't have to deal with things like bathtubs and waterproof wallboard. This is just going to be some tile, paint and a new sink. Which, yes, is more daunting than I make it sound. But the thought of having a stink free, Tiffany blue (I think) bathroom at the end makes it worth jumping in. Besides, it's not like we're doing anything else right now, right?

Let the dust fly!

November 10, 2010

Slipcover - Check!

Mostly because I was working on it instead of doing things I should have been doing. But whatever. I have a nasty cold, I should get to do things that make me smile. And this does.
Yes, yes, I know that the Orla-esque print is everywhere, but I've been a fan of the stem print since back in the day when you could only find Orla Kiely in the Made in Ireland store. Before Target and Anthropologie and everyone and their dog fell in love with her. And I still love it, so maybe this is my ode to Orla chair, since I very much doubt I'll ever get to have this one. Sigh, so pretty....

But back to the rocker. Will and I have been talking about adding some kind of print to the white slipcover on our couch and I decided that maybe trying it out on the cost-me-all-of-$15-to-make chair slipcover might be a good idea. And now I really like the white couch/orange mid century chair/white and orange printed rocker thing we've got going, so it may just stay this way. Or I may get really adventurous and make a few slipcovers for the chair so I can change things out when I get bored.
The slipcover was relatively easy, if a little time consuming. The back of the chair is an odd shape to fit well since it has to be loose enough to fit over that wide top but tight enough not to bag once it's on. I built it inside out, cutting out each piece and then pinning together and sewing the seams one at a time. There was a lot of back and forth from the chair to the sewing machine and a lot of pins, but it all worked out. I also painted the rockers and legs to cover up the weird smear marks that I made trying to fix the loose rocker long ago.
To make this print I used one of my all time favorite techniques - freezer paper stencils. If I was going to be stranded on an island and I could only bring one craft item, it would probably be freezer paper. That's assuming that I'd be needing to do crafts on this island of course, and really, I guess I'd need a few other things, like, say, something to use the freezer paper on. But you get the idea. I love the stuff. In fact, our coffee table is currently wrapped in it (plastic side down) so we can draw and color to our hearts content around here without worrying about Mr. Smells A Lot markers leaking through onto the actual table.
If you have a hankering to try out freezer paper as a fabric stencil, just cut out the image you want printed and iron it on with a hot, dry iron and paint away. I generally take the stencil off when the paint is still wet. I tell myself its to prevent any excess paint oozing off the paper and under the stencil, but really it's because I'm impatient to see what it looks like. There is always a magical sort of moment when you peel away the paper to find a crisp lined print remaining on your fabric. In fact, it's got my fingers itching to do another freezer paper stenciling furniture project. Maybe it's time to replace the dining room chair covers again...
In other news, Will is home (yay!) and he brought me three new Oliver+ S patterns that my lovely mother in law picked up at my favorite fabric store (squee!) the pie was yummy (num!) and I'm going to start teaching a sewing class for girls next week (whoo-hoo!), with more classes to follow I hope (maybe even some for grown-ups) so now I just need to stop sounding like a tragic consumptive in a Victorian novel (cough cough cough).